Mini Pumpkin Cheese Ball Bites are the ultimate fall party snack, and I promise you’ll want to make these every autumn! Each adorable little cheese ball is packed with creamy, tangy cheese, rolled in a bold cracker coating, and transformed into charming mini pumpkins with a pretzel stem and parsley leaf. Not only are they eye-catching on any Halloween or Thanksgiving table, but they’re also a surefire crowd-pleaser for kids and adults alike. This recipe is as fun to make as it is to eat, making it a festive must-have for your next gathering.
Ingredients You’ll Need
The ingredient list for Mini Pumpkin Cheese Ball Bites is refreshingly simple, yet each item plays an important role in the flavor, texture, or festive look of the final bite. Gather these basic pantry staples and you’ll be minutes away from a crowd-pleasing appetizer.
Cream Cheese (8 oz, softened): The creamy base that makes the cheese balls irresistibly smooth and easy to shape.
Shredded Cheddar Cheese (1 cup): Brings sharp, tangy flavor and gorgeous orange color for that pumpkin look.
Green Onions, finely chopped: Add a pop of freshness, color, and just the right hint of bite.
Garlic Powder (½ teaspoon): A touch of savory depth that pairs beautifully with cheese.
Smoked Paprika (½ teaspoon): Gives smoky warmth and enhances the autumnal orange hue.
Salt (¼ teaspoon): Essential for balancing all the flavors.
Black Pepper (¼ teaspoon): Adds subtle peppery heat.
Crushed Cheese Crackers (1 cup): Provides crunch, color, and even more cheesy goodness in every bite.
Small Pretzel Sticks (12): These become the whimsical “pumpkin stems” that top each cheese ball.
Fresh Parsley Leaves (optional): For a bright, leafy touch that makes these look even more like tiny pumpkins.
How to Make
Step 1: Mix the Cheese Filling
Start by mixing together your softened cream cheese, shredded cheddar, green onions, garlic powder, smoked paprika, salt, and black pepper in a medium bowl. This is where the magic starts: everything comes together into a smooth, flavorful, slightly tangy mixture that just begs to be snacked on right away. Be sure to mix thoroughly so every bite of your Mini Pumpkin Cheese Ball Bites is bursting with goodness.
Step 2: Shape Into Balls
Using a tablespoon or small cookie scoop, portion the cheese mixture and gently roll each portion between your hands to form bite-sized balls. This step is where the fun really kicks in! You’ll get about 12 little rounds ready to become pumpkins.
Step 3: Roll in Crushed Cheese Crackers
Pour the crushed cheese crackers onto a plate. Roll each cheese ball in the crumbs until completely coated. This not only gives your Mini Pumpkin Cheese Ball Bites an extra bold cheesy flavor, but also brightens up their color and adds wonderful crunch to every mouthful.
Step 4: Add Pumpkin Ridges
To give your bites an unmistakable pumpkin shape, use a toothpick to gently press vertical lines around each cheese ball. These ridges mimic the grooves of a real pumpkin and take the cuteness factor off the charts!
Step 5: Insert Pretzel Stems
Finish your pumpkins by pushing a small pretzel stick into the top of each cheese ball. The pretzel becomes the “stem” and adds an addictively salty snap when you bite in. For that extra fall touch, tuck a little parsley leaf next to the stem—your edible pumpkins are now ready to chill!
Step 6: Chill Before Serving
Arrange the finished Mini Pumpkin Cheese Ball Bites on a tray, cover, and let them firm up in the refrigerator for at least 30 minutes. This quick chill helps all the flavors meld together and ensures they hold their adorable pumpkin shape until it’s time to serve.
How to Serve
Garnishes
For a pop of color and life, don’t skip adding a small parsley leaf next to each pretzel stem—it’s amazing how this tiny touch brings your mini pumpkins to life! You can also finish the platter with extra chopped green onions or a sprinkle of smoked paprika for even more visual flair.
Side Dishes
Pair your Mini Pumpkin Cheese Ball Bites with fresh veggie sticks, crunchy crackers, or a bowl of skinny pretzel twists for easy dipping. They also fit beautifully alongside a board of grapes, sliced apples, and roasted nuts for a festive, fall-inspired snack spread.
Creative Ways to Present
Get playful! Nestle your cheese ball pumpkins on a rustic wooden board surrounded by colorful autumn leaves, or arrange them in a little “pumpkin patch” with toasted breadstick “fences” for a Halloween table. For Thanksgiving, plate them on a bed of leafy greens as a show-stopping centerpiece appetizer—your friends and family will absolutely love the presentation.
Make Ahead and Storage
Storing Leftovers
If you’re lucky enough to have a few Mini Pumpkin Cheese Ball Bites left, store them in an airtight container in the refrigerator. They’ll stay fresh and tasty for up to 2 days. Just be sure to set aside any extra parsley or pretzel stems separately so they don’t get soggy.
Freezing
While these are best enjoyed fresh, you can freeze uncoated cheese balls for up to a month. Place them on a tray to freeze individually, then transfer to a zip-top bag. When ready to serve, thaw in the fridge overnight, then roll in cracker crumbs, add the pretzel stem, and garnish just before presenting.
Reheating
There’s no need to reheat Mini Pumpkin Cheese Ball Bites—these are designed to be served chilled or at room temperature. If they’ve been in the fridge, simply let them sit out for 10–15 minutes before enjoying, so they’re as creamy and flavorful as possible.
FAQs
Can I make Mini Pumpkin Cheese Ball Bites in advance?
Absolutely! You can prepare and shape them up to 24 hours ahead of your event. Just hold off on adding the pretzel stems and parsley until right before serving to keep them crisp and fresh.
Can I use a different cheese besides cheddar?
Yes! Try swapping in finely shredded Monterey Jack, pepper jack for a spicy kick, or even a mix of cheeses. Just make sure to stick with cheese that melts smoothly into the cream cheese base for the best texture.
What’s the best way to crush the cheese crackers?
Place your crackers in a sturdy zip-top bag and crush with a rolling pin, or pulse them in a food processor until you get even crumbs. Aim for a texture similar to coarse sand for the perfect cheesy coating.
How do I avoid sticky hands when rolling cheese balls?
Try chilling the cheese mixture for 10–15 minutes before shaping, or lightly coat your hands with a little water or oil. This makes rolling the Mini Pumpkin Cheese Ball Bites a breeze!
Are these safe to serve to kids?
Definitely! These bites are mild, colorful, and fun—perfect for little hands at Halloween parties or Thanksgiving gatherings. If you’re worried about choking hazards, just break the pretzel stems into smaller pieces for the youngest guests.
Final Thoughts
Whether you’re hosting a holiday party or just love festive, bite-sized snacks, you have to try these Mini Pumpkin Cheese Ball Bites. They always disappear fast—so make a double batch if you can! Have fun making them, and enjoy the happy faces around your table.
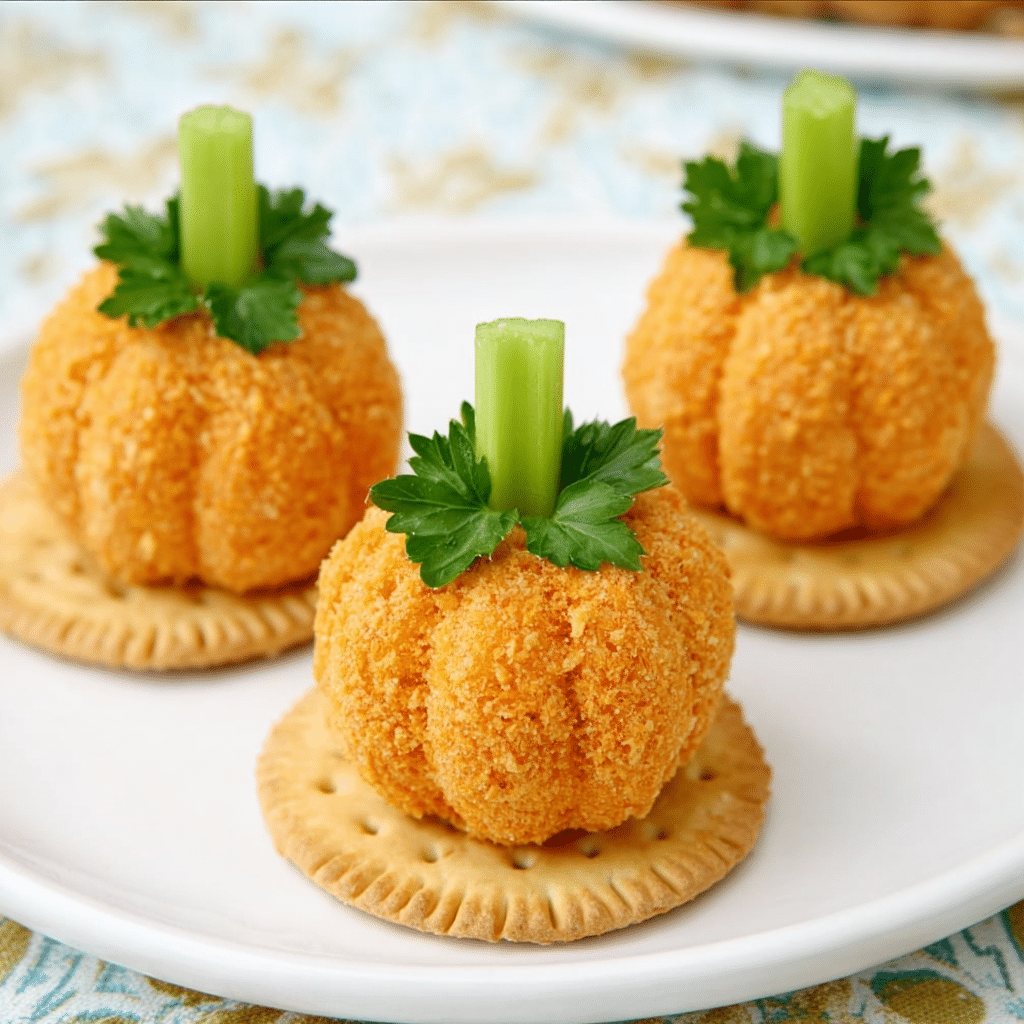
Adorable mini pumpkin-shaped cheese balls made with a creamy, savory cheese mixture. Coated in crushed cheese crackers and finished with a pretzel stick stem, these festive bites are as tasty as they are fun—perfect for Halloween, Thanksgiving, or any autumn gathering.
Ingredients
Cheese Ball:
8 oz cream cheese, softened
1 cup shredded cheddar cheese
2 green onions, finely chopped
½ teaspoon garlic powder
½ teaspoon smoked paprika
¼ teaspoon salt
¼ teaspoon black pepper
Coating and Garnish:
1 cup crushed cheese crackers (like Cheez-Its or Goldfish)
12 small pretzel sticks
Fresh parsley leaves, for garnish (optional)
Instructions
In a mixing bowl, combine cream cheese, cheddar, green onions, garlic powder, paprika, salt, and pepper. Mix until smooth. Scoop mixture into tablespoon-sized portions and roll into balls.
Roll each ball in crushed cheese crackers until fully coated. Use a toothpick to press vertical lines around each ball to resemble pumpkin ridges.
Insert a pretzel stick in the center as the “pumpkin stem.” Garnish with a small parsley leaf next to the stem for a pumpkin look.
Chill in the refrigerator for at least 30 minutes before serving.
Notes
These can be made up to 24 hours in advance—store covered in the fridge until serving.
Try mixing in crumbled bacon or diced jalapeños for extra flavor.
Serve with crackers, pretzels, or veggie sticks for dipping.